If you are running iOS 11 and above, you may already be familiar with the Quick Start function. This is a great feature provided by Apple, allowing users to set up a new iOS device from an old one much easier and faster. You can use Quick Start to quickly transfer data from your old iOS device to the new one including settings, app information, photos and so much more. In iOS 12.4 or later, Quick Starts also provides the option of using iPhone migration, enabling you to transfer data wirelessly between devices.
But like every other iOS feature, Quick Start can fail to work as expected sometimes. In this article, we are going to show you 5 effective ways to fix iPhone Quick Start not working problem in iOS 14/13. Read on to learn how.
- Part 1. How to Use Quick Start on iPhone
- Part 2. How to Fix iPhone Quick Start Not Working
- Way 1: Ensure Both iPhones use iOS 11 or Later
- Way 2: Turn On Bluetooth on your iPhones
- Way 3: Restart Two iPhones
- Way 4: Manually Set Up iPhone/iPad
- Way 5: Contact Apple Support for Help
Part 1. How to Use Quick Start on iPhone
Before we get to the solutions, it is important to ensure that you are actually using Quick Start correctly. The following are just some of the things to consider when using Quick Start:
- You need to make sure that both devices are running iOS 11 or later. The version of iOS that the devices are running doesn’t have to be the same (you can transfer data from an old iPhone running iOS 12 to a new iPhone running iOS 14/13).
- If you want to use the iPhone Migration feature (setting up a new device without iTunes or iCloud), both devices need to be running iOS 12.4 or later.
- When using the iPhone Migration feature, make sure that the two phones are close to each other.
- You should also make sure that Bluetooth is turned on and that both devices have adequate battery since running out of power can stop the process and cause issues.
After that, you can follow the steps blow to do a Quick Start:
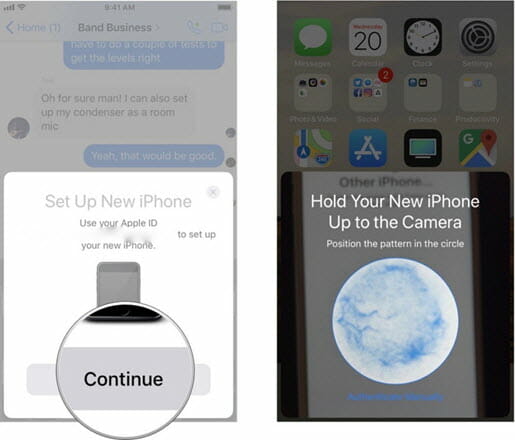
- Power on your new iPhone and keep it close to the old device. When the Quick Start screen shows up on the old iPhone, select the option of setting up your new device with your Apple ID.
- Click on “Continue” and you will see an animation on your new device. Just center it in the viewfinder and wait for a while until you see a message that says “Finish on New [Device]”. Then enter you old iPhone’s passcode on your new device when required.
- After that, follow the on-screen prompts to set up Touch ID or Face ID on your new iPhone. Then you can choose to restore apps, data and settings from your iCloud backup.
Part 2. How to Fix iPhone Quick Start Not Working
If you have followed all the instructions correctly and you still have issues with Quick Start, try the following solutions:
Way 1: Ensure Both iPhones use iOS 11 or Later
Like we’ve already seen, Quick Start will only work if both devices are running iOS 11 or newer. If your iPhone is running iOS 10 or earlier, the best thing you can do is to update the device to the latest version.
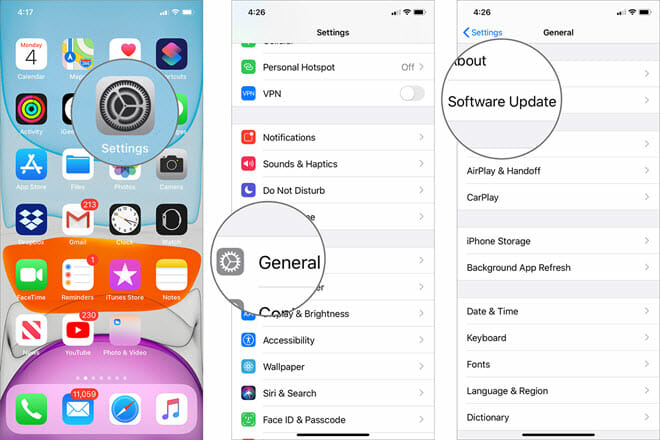
To update the device to the latest version of iOS, go to Settings > General > Software Update and then tap “Download and Install” to get the latest version. Once both devices are running the latest version of iOS, Quick Start should work. If it doesn’t, try our next solution.
Way 2: Turn on Bluetooth on Your iPhones
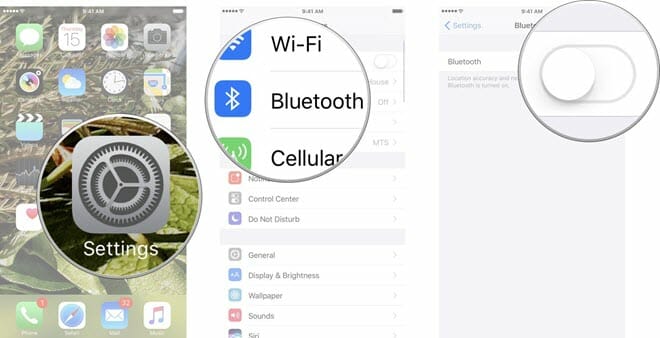
The Quick Start feature uses Bluetooth to transfer the data from the old device to the new one. Then the process will only work if Bluetooth is enabled o both devices. To enable Bluetooth, go to Settings > Bluetooth and turn it on. Once it has been successfully enabled, you should see the Bluetooth icon on the screen.
Way 3: Restart Two iPhones
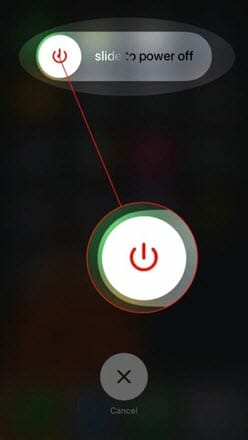
You may also have problems with the Quick Start feature if your device has software glitches or settings conflicts. In this case, the best way to overcome these issues is to restart the two iPhones. Here’s how to restart the iPhone:
- For iPhone 12/11/XS/XR/X – Keep holding the Side and one of the Volume buttons until the “slide to power off” appears. Drag the slider to power off the device and then hold the side button to turn on the device again.
- For iPhone 8 or earlier – Keep holding the Top or Side button until the “slide to power off” shows up. Drag the slider to turn off the device and then hold the Top or Side button again to turn it on.
Way 4: Manually Set Up iPhone/iPad
If you are still unable to use Quick Start to set up a new device, we recommend using Wondershare dr.fone – Phone Transfer to transfer the data from the old device to the new one. This tool is highly effective in the transfer of most types of data from one iOS device to another and very helpful when switching devices. Some of its key features include the following:
- It can be used to move data between mobile devices even if they are running on different operating systems
- It can transfer most types of data including contacts, SMS, videos, music and more.
- It is very easy to use, allowing users to transfer data from one phone to another in a single click.
- It is fully compatible with all versions of iOS and Android OS, including the latest iOS 14 and Android 10
Download and install dr.fone toolkit on to your computer and then follow these simple steps to manually set up your new iPhone/iPad:
Step 1: Launch the toolkit on your computer and then select “Phone Transfer” from the list of modules on the main screen.

Step 2: Connect both iPhones to the computer and wait for the program to detect the devices. Ensure that the old device is the “Source” device and the new one is the “Destination” device. If this order is not correct, click on “Flip” to change it.
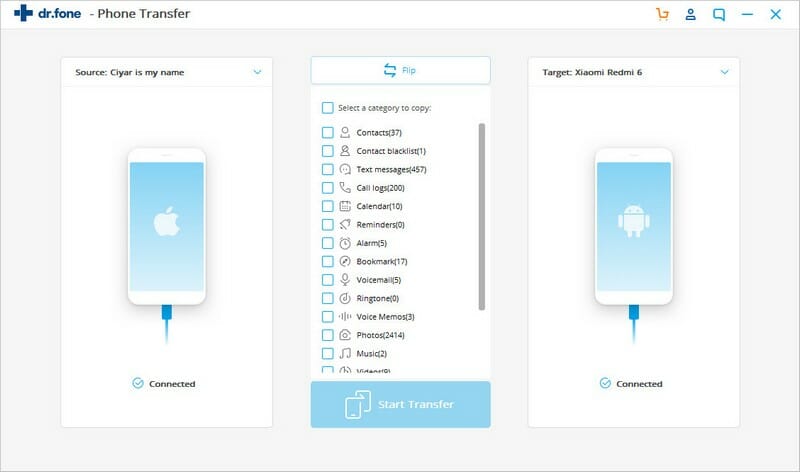
Step 3: Choose the types of files you would like to transfer to the new iPhone and then click on “Start Transfer”. Be sure to keep both devices connected to the computer until the process is complete.
Note: If you would like to delete the data from the destination device before transfer, check the option of “Clear Data Before Copy”.
Way 5: Contact Apple Support for Help
If all the solutions above fail to work, we recommend that you contact Apple support for more assistance. Sometimes there could be a hardware problem with your devices and Apple technicians may be better placed to help you identify and fix these problems.
You May Also Like:
Hot Tools
Featured Posts
- 5 Free Ways to Recover Deleted Instagram Messages
- Top 5 Ways to Fix iPhone is Disabled Connect to iTunes
- 10 Best YouTube to MP3 320kbps Converter (Online & Desktop)
- 9xbuddy Not Working? 9 Best Alternatives to 9xbuddy
- Top 10 Best 4k YouTube Downloader [2023 Review]
- Top 12 Best YouTube Video Downloader Free Online for 2023
- [Fix]How to Recover Data after Factory Reset Android
- How to Recover Data from Android with Broken Screen
- 7 Tips to Fix iMessage Not Syncing on Mac [2021]
- 13 Best Ways to Fix iMessage Is Signed Out Error on iPhone[2023]
- [Fixed]iPhone Stuck on Preparing Update 2023


